In this whitepaper, you will understand the fundamentals of AUTOSAR OS task mapping — from its architecture and task models to the step-by-step process of configuring Runnables in OS Tasks. Whether you’re new to AUTOSAR or looking to refine your configuration skills, this guide covers everything you need to know.
What is AUTOSAR OS?
AUTOSAR OS evolved from the well-established AUTOSAR OS (OSEK) standard. While the underlying philosophy remains largely the same, AUTOSAR OS introduces critical enhancements for modern automotive software — including multicore support, memory protection, and timing protection.
Two foundational principles carried forward from OSEK are:
- Standardised Interfaces: Application components interact with the OS and communication stack through standardised interfaces, regardless of the underlying processor.
- Portability of Application Software: These standardised interfaces enable true application software portability across different hardware platforms.
Architecture of AUTOSAR OS
AUTOSAR OS defines three processing levels that govern how code executes on the microcontroller:
- Interrupt Level
- ISR Category 1 (ISR1): Interrupts managed without OS intervention. Callbacks can be written directly in the Complex Device Driver (CDD).
- ISR Category 2 (ISR2): Interrupt service routines fully managed by the operating system.
- Logical Level for Scheduler: Includes scheduling tables and alarm-based activations.
- Task Level: Encompasses Basic Tasks and Extended Tasks — the core execution units of the OS.
Key Differences: OSEK OS vs. AUTOSAR OS
AUTOSAR OS Task Mapping: A Step-by-Step Guide
AUTOSAR OS task mapping is one of the most critical configuration steps in automotive software development. Here is the complete process:
Step 1: Create a Task
Define an OS Task in your AUTOSAR configuration tool. This task will serve as the container for one or more Runnables.
Step 2: Choose Basic Task or Extended Task
This is a fundamental design decision. Understanding the difference is key to a well-architected system.
Basic Task — Three-State Model
Basic Tasks operate with three states: SUSPENDED, READY, and RUNNING. They cannot block inside the task body.
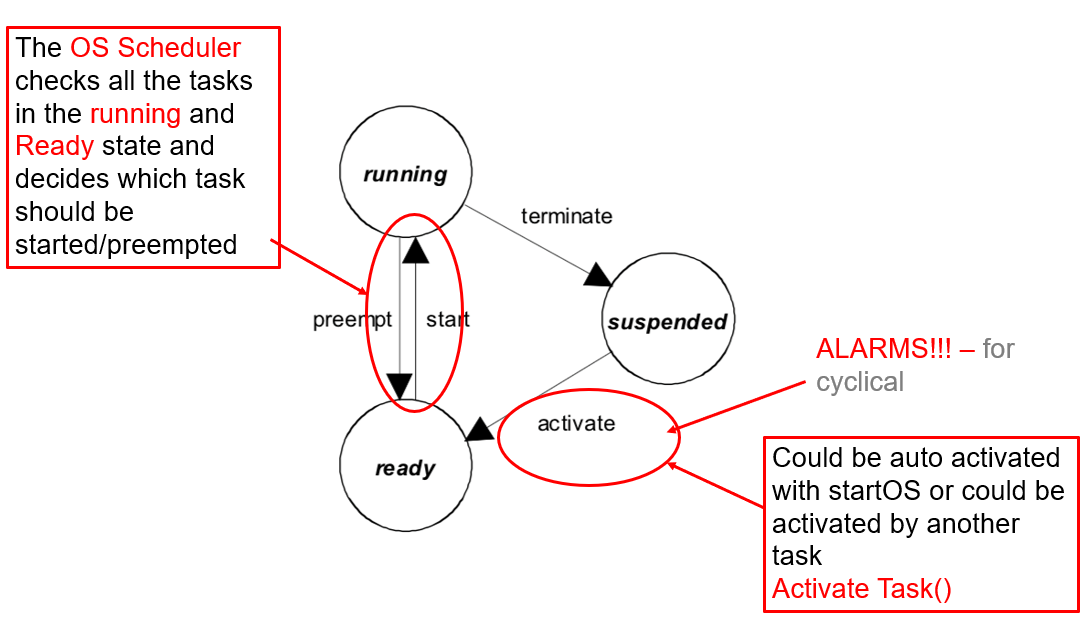
Figure 1: State Model of a Basic Task
KEY RULE: A Basic Task must always end withTerminateTask()orChainTask(). Falling off the end of the task function without calling one of these results in an OS error (E_OS_MISSINGEND).
Extended Task — Four-State Model
Extended Tasks add the WAITING state. The task can call WaitEvent(EventMask) inside its body, which suspends execution until another entity sets the awaited event.
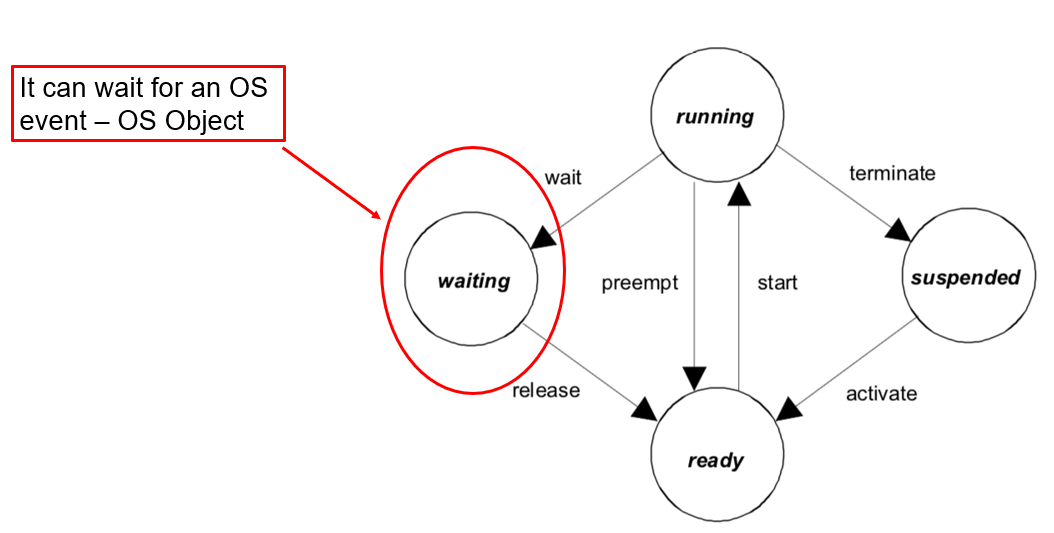
Figure 2: State Model of an Extended Task
A Simple Analogy
Think of a Basic Task as a delivery person — they come only when called, deliver, and leave. An Extended Task is like a security guard — always present, sitting quietly, waiting for something to happen. When an event occurs, they act and then go back to waiting.
How Basic Tasks Work in Practice
Case 1: Same trigger for all Runnables
When all Runnables mapped to a Basic Task share the same trigger, the RTE generates straightforward cyclic function calls activated by an alarm.
Case 2: Different periods on the same task
Consider a Basic Task called Task_10ms activated every 10ms by an alarm, but with three Runnables at different periods:
Runnable_CanProcess— runs every 10msRunnable_Algorithm— runs every 20msRunnable_NvM_Housekeep— runs every 50ms
The RTE uses an internal counter to determine which Runnables execute on each activation — similar to a schedule table pattern.
How Extended Tasks Work Internally
The internal mechanism of an Extended Task follows a precise sequence:
- Every Runnable trigger becomes an OS Event. Unlike Basic Tasks where alarms directly activate the task, Extended Tasks use event bits set on an already-running task.
- The task is activated at system startup (via
AutoStart=TRUEorStartupHook) and never terminates. - Runnables sharing the same trigger are mapped under a single shared event (e.g.,
Ev_10ms) and execute inside the same event-handling block. - The task body runs as an infinite loop with
WaitEvent()at the top. Each iteration asks the OS: “Has anything happened that I need to handle?” - Cyclic events are generated by OS Alarms at system startup.
- Other RTE events (e.g., on data reception) are generated by the RTE implementation itself.
The WaitEvent/SetEvent Mechanism
When a task calls WaitEvent(), two scenarios are possible:
- Event already set: Task does NOT block — it continues execution immediately (avoiding missed events).
- Event NOT set: OS puts the task into WAITING state, stops execution, removes it from the scheduler, and dispatches the next READY task.
When an event occurs via SetEvent() (from an ISR, another task, or an alarm callback), the OS marks the event in the task’s event mask and moves the task from WAITING to READY. The task then resumes right after WaitEvent(), calls GetEvent(), processes the events, and clears them using ClearEvent().
Important: This is NOT busy waiting. The CPU is freed when no event is pending, making the system both deterministic and efficient.
Step 3: Assign Task Priorities
Task priorities control the execution order and ensure time-critical operations run before less critical ones.
- Higher numerical value → Higher priority (in most AUTOSAR implementations)
- Lower numerical value → Lower priority
AUTOSAR OS uses priority-based preemptive scheduling — the scheduler always runs the highest-priority READY task.
Step 4: Choose Preemptive or Non-Preemptive
- Preemptive Tasks: Can be interrupted by higher-priority tasks. Suitable for time-critical operations.
- Non-Preemptive Tasks: Cannot be interrupted once started. Best used when data consistency is critical.
Step 5: Enable AutoStart
Tasks with AutoStart=TRUE are activated at system startup. A Basic Task starts in SUSPENDED state and gets activated cyclically by an alarm, while an Extended Task starts once at startup and never terminates.
Step 6: Map Runnables to the OS Task
Assign your Runnables to the appropriate task based on their trigger type, criticality, and timing requirements.
Step 7: Set Runnable Execution Order
The position of Runnables within a task determines their execution order. For example, if Runnable A is at position 1, Runnable B at position 2, and Runnable C at position 3 — they will execute in that exact sequence.
10 Best Practices for AUTOSAR OS Task Mapping
- Avoid mixing different triggers for Runnables mapped under a Basic Task.
- Use AutoStart only for Extended Tasks — Basic Tasks should be alarm-activated.
- Prefer Basic Tasks wherever possible — they are simpler and more predictable.
- Map Category 2 Runnables to Extended Tasks and other Runnables to Basic Tasks.
- Higher cycle frequency = Higher task priority. Fast Runnables need higher-priority tasks.
- Higher priority tasks should have shorter execution times to avoid blocking the system.
- Use ISR Category 2 for most interrupts. Avoid ISR1 unless absolutely necessary.
- Distribute Runnables across multiple tasks. Packing too many long Runnables into few tasks makes scheduling infeasible.
- Use schedule points in non-preemptive tasks. Configure points where the task checks for higher-priority tasks waiting to execute.
- Synchronous Server Runnables do not need OS Task mapping. They are called directly by the RTE.
Related Articles from ANCIT
This whitepaper is authored by Dr. Kaarthick Balakrishnan and published by ANCIT — a leading automotive engineering training company specialising in AUTOSAR, Embedded Systems, Functional Safety, and Software-Defined Vehicles. For training enquiries, contact us at beeshma@ancitconsulting.com or call +91 9840378602.